Naguel

I'm Nahuel, and these are my work experiences, ideas and thoughts as a web developer working on the eCommerce industry.

Proper way to configure asynchronous email sending in Magento

Proper way to configure asynchronous email sending in Magento

There are two ways to configure how Magento send order related emails (order confirmation, invoice, shipment and credit memo emails):

  • Either immediately when an action is performed (for example, right after you place an order).
  • Or cron-based (asynchronous).

Magento itself recommends to configure this to be asynchronous for performance reasons, so the email dispatch process doesn't block nor delay what the customer is doing (for example, less time consumption when the customer is placing an order), or to avoid long cron runs (or total crons block) when an ERP is updating orders status in bulk.

Enabling the “Asynchronous email notifications” setting moves processes that handle checkout and order processing email notifications to the background.

Configuration best practices by Magento

For my personal experience, it is also recommended to configure emails sending to be asynchronous to avoid having unsent emails.

When this is configured as immediately (not async), if an email fails to be dispatched because of any reason (like a server timeout) then Magento won’t try to send that email again in the future and the customer won’t be ever notified of his/her action.

Basically, there are a lot of good reasons to have this to be async.

Before setting this up

If you are going live for the first time on a new site there's not much to worry about, but if you are changing this setting from not-async to cron-based on an already live site then there's something to consider first.

The way this works when it's configured to be async is that Magento will rely on a cron to pick up from the database (from those tables related to Orders, Invoices, Shipments and Credit Memos) all those entities where the email was not dispatched, and it will send it.

Problem is that Magento doesn't care much about the date of those entities.

For example, if there’s an Order from 2019 whose order confirmation email was not sent because of any reason (for example, because there was a PHP error that stopped the execution), the cron will now pick this Order up and Magento will send the email related to that order.

To avoid this behaviour we should mark all pending emails from Orders, Invoices, Shipments, and Credit Memos as if they doesn't need to be dispatched, which can be done by executing the following SQL statements before enabling the asynchronous sending.

UPDATE sales_order SET send_email = 0;
UPDATE sales_invoice SET send_email = 0;
UPDATE sales_shipment SET send_email = 0;
UPDATE sales_creditmemo	 SET send_email = 0;

What we are doing here is ignoring the sending of emails for old Orders (and Invoices, Shipments and Credit Memos) so when we change this to be async the cron will only cares for future stuff.

Changing the configuration

Enable the “Asynchronous sending” option under “Stores → Settings → All Stores → Sales → Sales Email → General Settings”.

Lazyload post Feature Image from Unsplash in Ghost

Lazyload post Feature Image from Unsplash in Ghost

Unsplash is a great Ghost built-in integration that allows you to quickly add an image to your posts, and I personally use it every time to add the Feature Image to all my articles (the big one below the title, before the content).

Unfortunately, out of the box the image from Unsplash is really big (2000px wide) and impacts on the page speed of the site since the browser will download the image first then continue with the rest of the page.

There's no much we can do about the image size as we can't follow the "How to use responsive images in Ghost themes" official guide because that only applies to images you manually upload and not those coming from third-parties...

Dynamic image sizes are not compatible with externally hosted images. If you insert images from Unsplash or you store your image files on a third party storage adapter then the image url returned will be determined by the external source.

...but with a little bit of HTML and JavaScript we can lazy load them to prioritize the content over the image download.

Usually, the Feature Image in the Ghost theme will look something like:

<img src="{{feature_image}}" />

This is a classic img tag with the src containing the URL of the image. But we need to do some changes here first before moving to the JS side of this technique.

In the src we are going to put a placeholder image to avoid having a broken image while the rest of the page loads, we are going to move the actual image to the data-src attribute, and finally we'll add a new class to the element.

<img src="{{asset "images/placeholder.png"}}" data-src="{{feature_image}}" class="lazyload" />

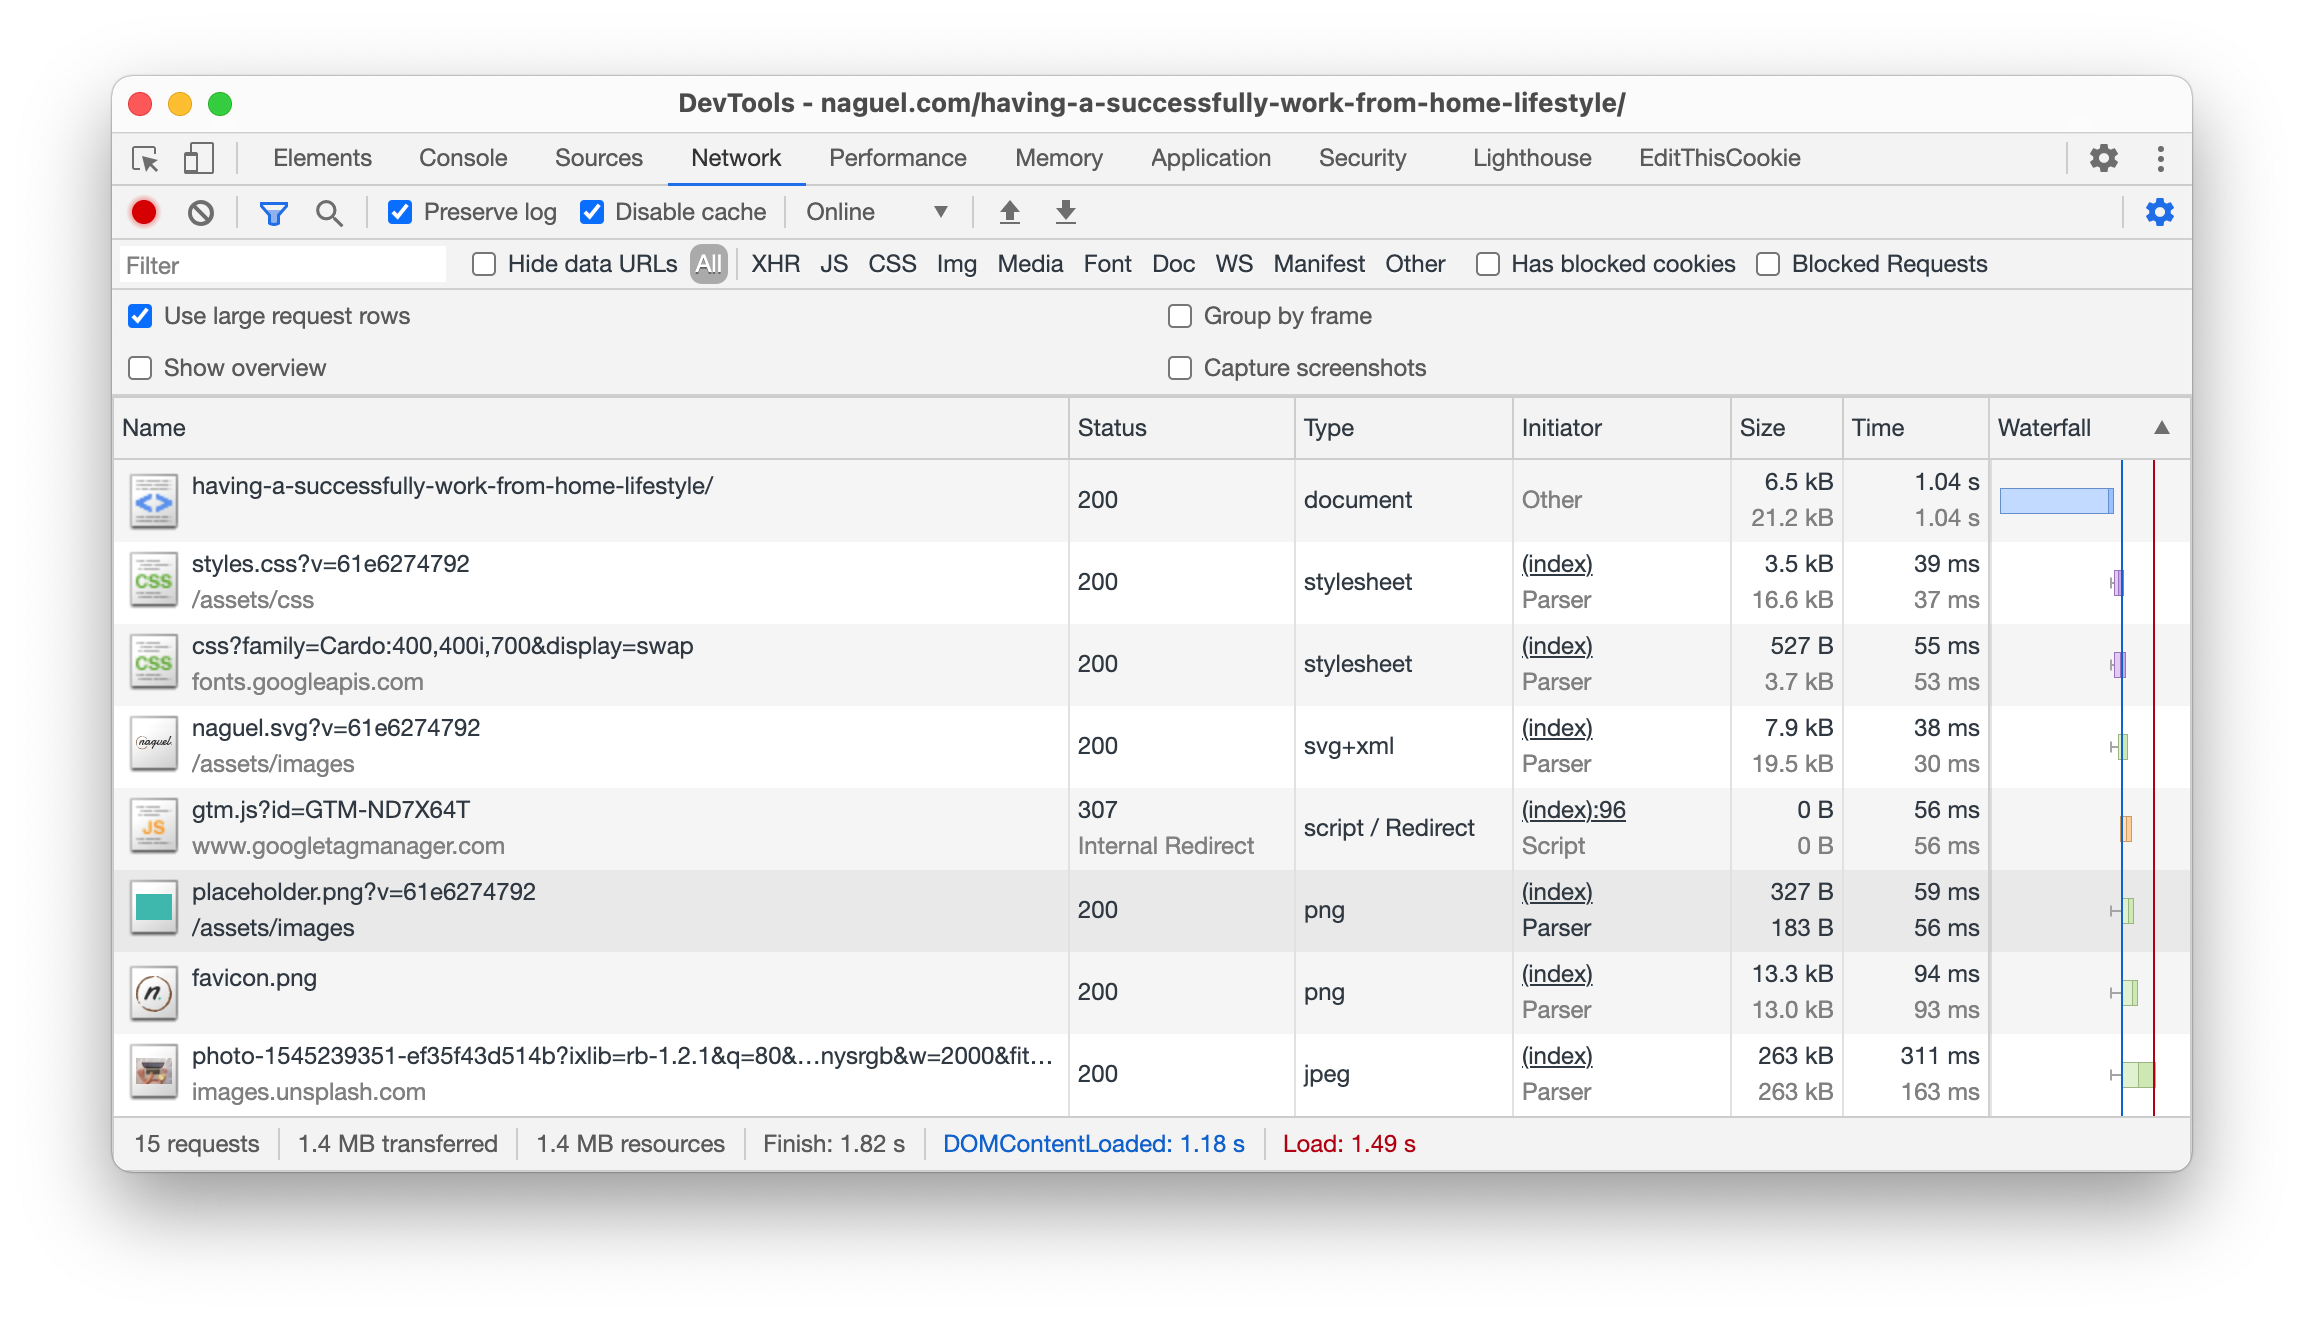
The placeholder image should be a small image in terms of weight. I'm using an image with a solid colour of 183 bytes so I can "reserve" the space of the final Feature Image to avoid "jumps" in the browser while everything loads.

Finally, the JS is quite simple. We need to wait for the window to be loaded, get all the img elements with the lazyload class, and replace the src with what's on the data-src so we trigger the actual image download.

window.addEventListener('load', (event) => {
    let images = document.getElementsByClassName('lazyload');

    for (let i = 0; i < images.length; i++) {
        images[i].src = images[i].dataset.src;
    }
});

With this in place we should see that the content is prioritized over the Unsplash image, and if we are using a placeholder we should see that first in the "Network" tab of our browser's DevTools, with the actual image loading later.

Change Googlebot crawl rate

Change Googlebot crawl rate

As weird as it sounds it could happen that Google hits your site at a pace your server won't be able to handle, causing page speed issues and a potential site down related to a high CPU usage and too many MySQL connections.

Google claims to be smart enough to be able to self-regulate the crawl rate at which it hits a site (they said that they have "sophisticated algorithms to determine the optimal crawl speed for a site"), but that's not true all the time.

If you can contact your hosting provider, they might be able to tell you the number of requests the bots are making (where around 20000 in the last six hours could be enough to cause issues) and the logs for those calls.

185.93.229.3 - - [23/Sep/2021:05:32:55 +0000] "GET /about/ HTTP/1.0" 200 20702 "-" "Mozilla/5.0 (compatible; Googlebot/2.1; +http://www.google.com/bot.html)"

Make sure that the IP you are seeing on the logs are really from Google not being smart about the crawl rate, and not a DDoS attack in disguise.

If you are certain about Googlebot being the one causing the problems with your server, you need to adjust the crawl rate first, and then block Google, temporarily, while you wait for the new crawl rate to take effect.

Adjust the crawl rate using Google Search Console

If you are thinking about controlling the crawl rate using the Crawl-delay directive on your robots.txt file, forget it. Google ignores that.

You need to use what's remaining of the old Google Search Console, not the new fancy one, here https://www.google.com/webmasters/tools/settings.

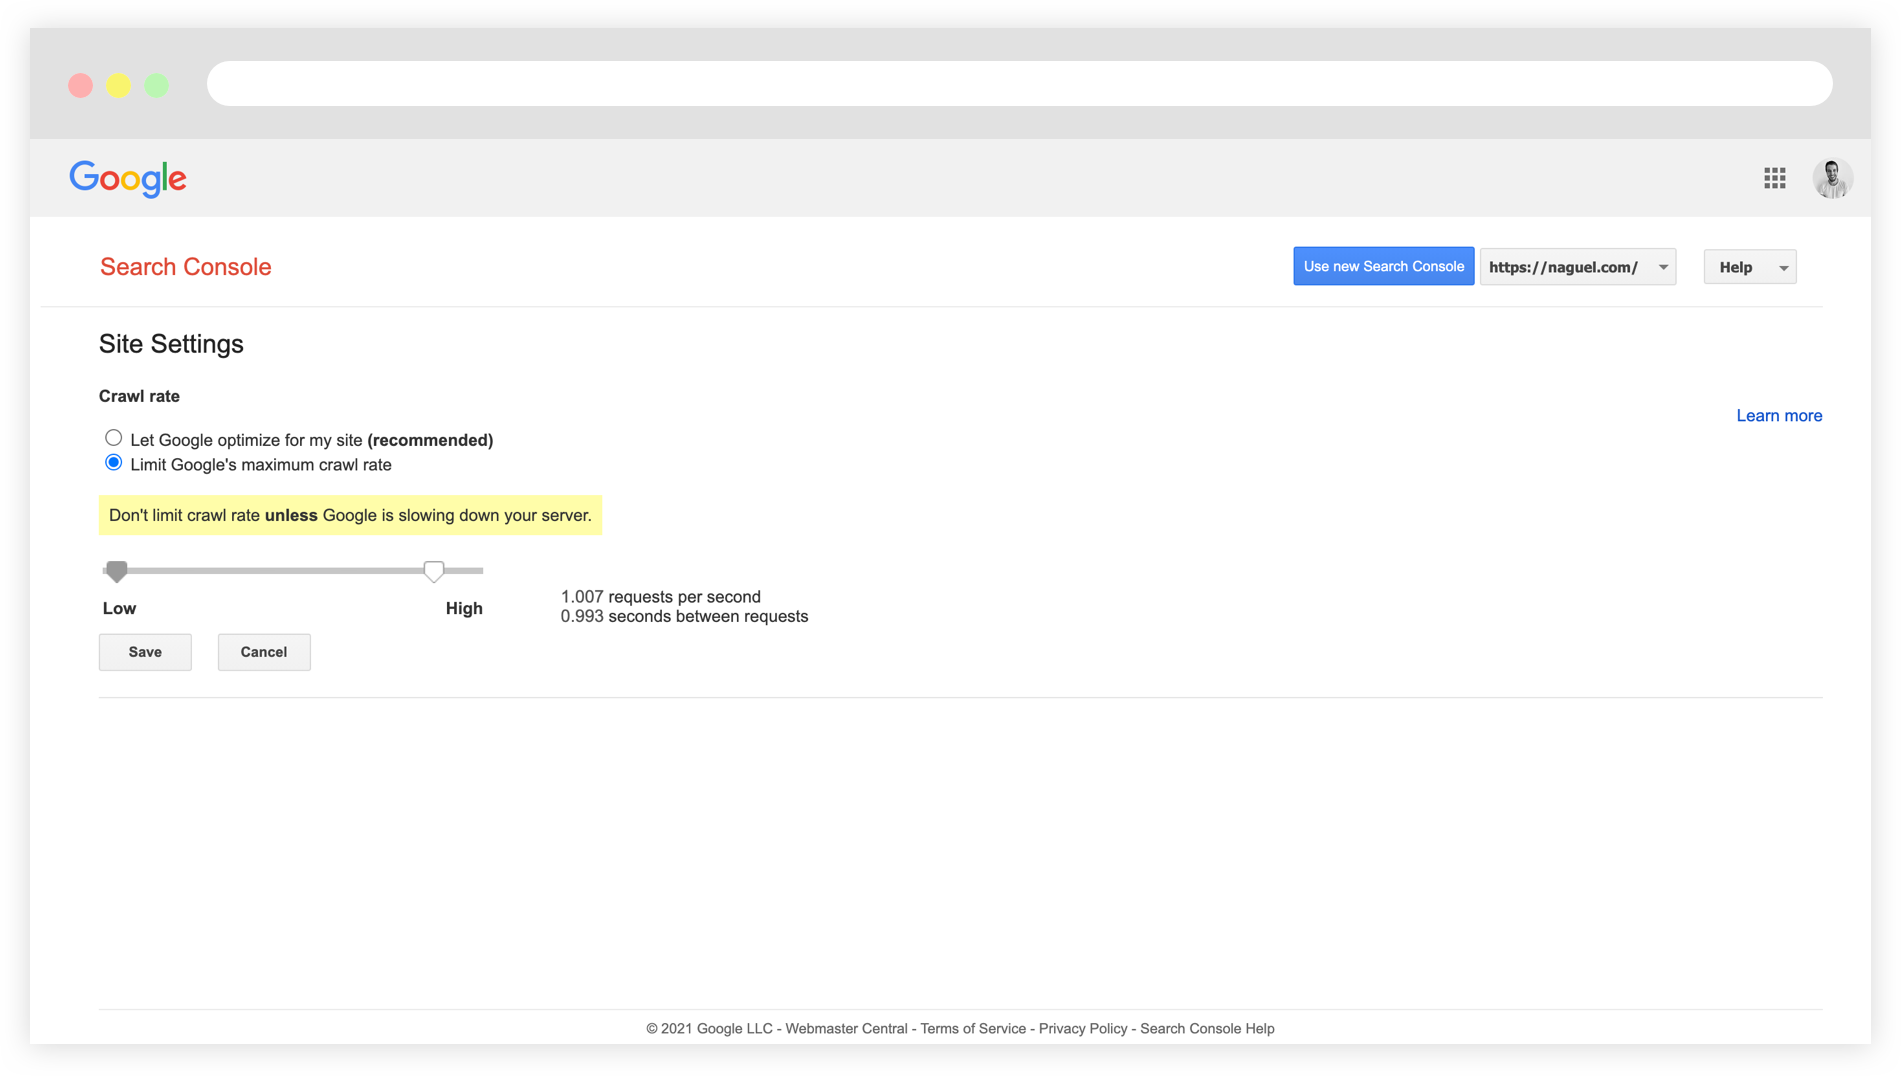
Selecting the “Limit Google's maximum crawl rate“ option will display a slider for you to configure a lower crawl rate.

How low? I can't tell you exactly, since that would depend on your site and server capacity, but as reference I remember configuring it as follow for a Magento project living on a size XL AWS instance.

1 requests per second
1 seconds between requests

You can try something like that, or even lower, maybe at 0.5 requests per second.

Block Googlebot temporary for a few days

So, here's the catch: the new crawl rate setting is not immediately applied.

After saving the new crawl rate you'll get a message saying that "Your changes were successfully saved and will remain in effect until Sep 17, 2021" but it's not until you open up the confirmation email that you'll read that "within a day or two, Google crawlers will change crawling to the maximum rate that you set".

This means that your site will keep on getting hit at the same pace for a day or two, so the solution is to block Google for that period of time while you wait for the new crawl rate to get into effect.

Remember to lift the ban on Google after 2 days, and monitor for the following days that Google isn’t affecting the site performance again (so confirming the new crawl rate is working, otherwise you might need to bring it down a little more).